
目次 [ Contents ]
In general DSLR, there are remote release function of IR on their camera. I tried to use the IR function with Arduino. It’s a DIY Remote control.
This article mentions about only Nikon DSLR, cos I don’t have other maker DSLR.
Electronic parts used
- Arduino (This time, I used 3.3V pro mini.)
- A tact switch
- IR LED
- Resistor
- A capacitor
- (if you have) normal LED & Resistor
Calculate resistor value by yourself, since it depends on the Arduino you use and the infrared LED.
The capacitor is used as stabilizer of electric, I think. So its value is not strict.
A transistor
It is good to operate a current amount separately by using a transistor in order to earn infrared flying distance. Of course, it works without it anyway.
As reference, I used this transistor.
NPN 2SC1815-GR
This transistor is such pin specification.
Wiring
It’s simple, same wiring as normal LED using switch.
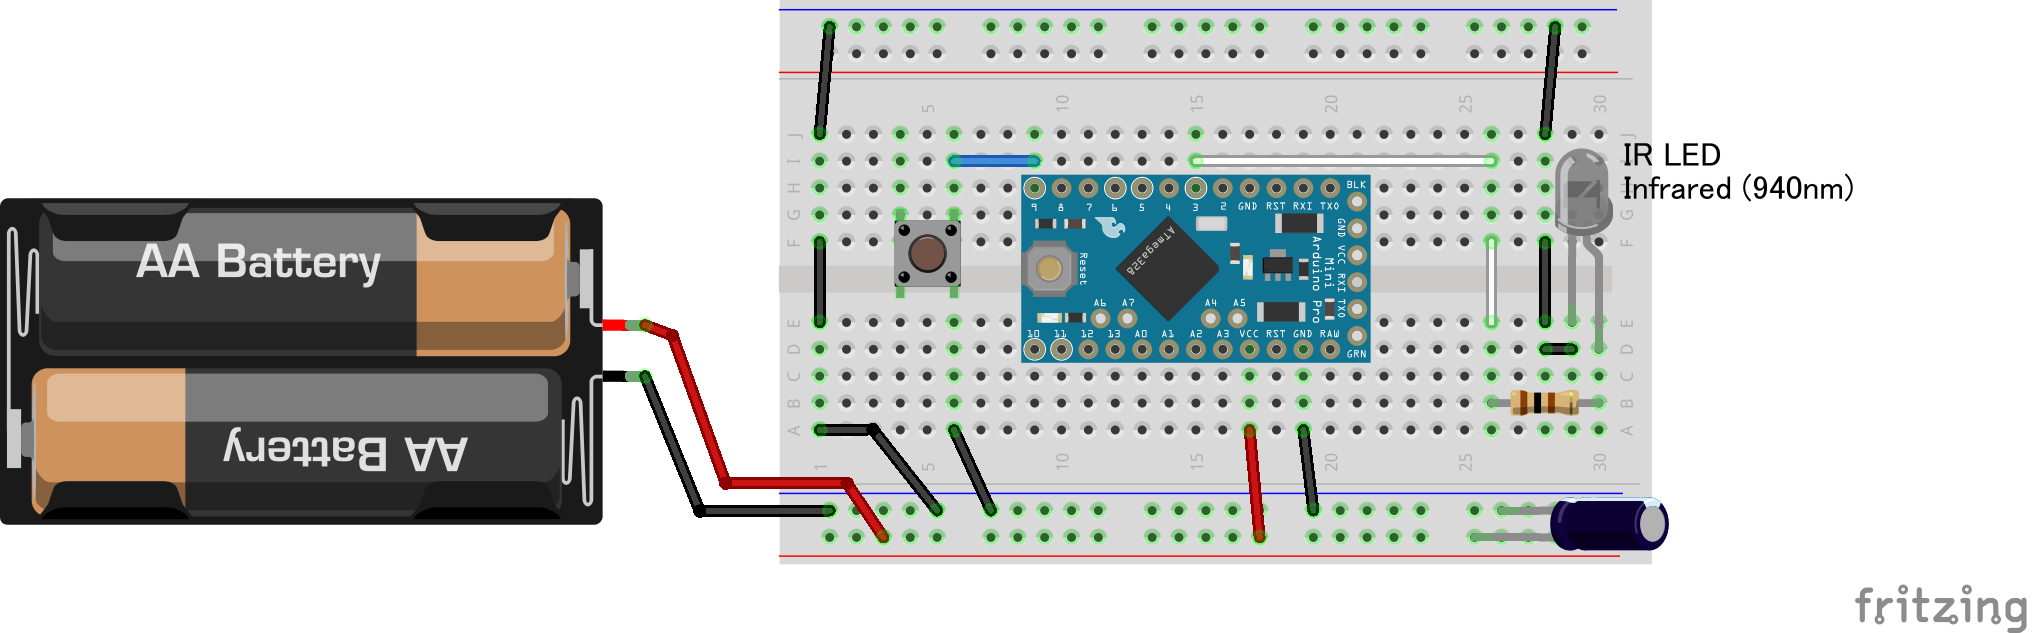
If you have, normal LED is available on D13 pin for confirm working.
Sample sketch
Anyway, I have confirmed this sample works.
#define LED    13
#define IRLED  3
#define SW     8
#define SW_PUSH     700
#define NIKON_RANGE 8


void setup() {
  pinMode(LED, OUTPUT);
  pinMode(IRLED, OUTPUT);
  pinMode(SW, INPUT_PULLUP);
}


void loop() {
  unsigned int gauge;
  while (!digitalRead(SW)) gauge++;
  if (gauge > SW_PUSH)
  {
    digitalWrite(LED, HIGH);
    SHUTTER_GO();
    delay(100);
    digitalWrite(LED, LOW);
  }
}

unsigned short ShutterDATA[NIKON_RANGE][NIKON_RANGE] = {
  {2000 , 1},
  {28000, 0},
  {400  , 1},
  {1580 , 0},
  {400  , 1},
  {3580 , 0},
  {400  , 1},
  {63200, 0}
};

void SHUTTER_GO() {

  digitalWrite(IRLED, 0);   // IR LED off forcely
  delay(100);

  // send total IR Signal 2 times
  for (byte repeat = 0 ; repeat < 2 ; repeat++)
  {
    //each IR Pulse
    for (byte i = 0 ; i < NIKON_RANGE ; i++)
    {
      unsigned long time_bit = micros();  // get start

      while ((micros() - time_bit) <= ShutterDATA[i][0])
      {
        digitalWrite(IRLED, ShutterDATA[i][1]);
        delayMicroseconds(5);
        digitalWrite(IRLED, 0);
        delayMicroseconds(10);
      }
    }
  }
  digitalWrite(IRLED, 0); // IR LED off forcely
}
Notes in IR use
Basically, there are no different to use IR LED as well as normal LED. But some notes you should know in use IR.
IR LED
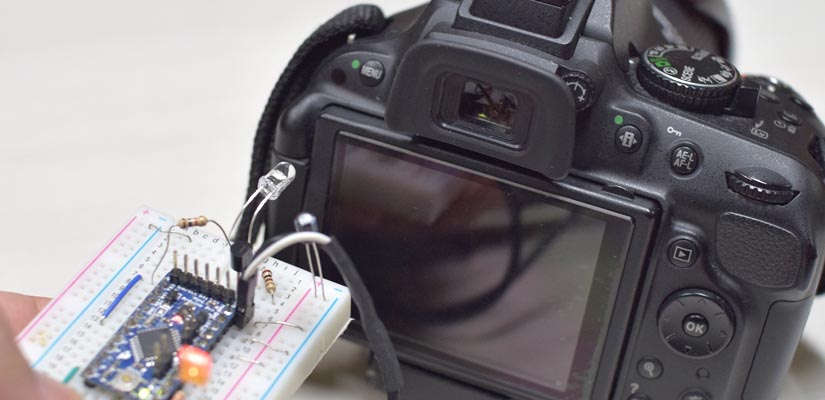
invisible
Human can not watch Infrared ray. So, it makes difficult to check its work.
Infrared can be seen with video cameras and some DSLR cameras preview. So check with it, if you have.
Infrared directivity
Infrared LEDs that can be easily obtained are often narrow directivity. The more truth, it seems that infrared LEDs are not such as to be irradiated in all directions.
This means a little misalignment of direction causes transmission fail. You may think it’s not truth, but in fact, some IR remote has multiple IR LED.

I didn’t know that and it made me confused. “why it doesn’t work!”.
You have to keep IR LED close to receiver as possible during experiment until you get to works well.
In my experience, working distance of IR is for 1 meter half. If you want to get more distance, much more scheme is needed for electric parts and wiring.
Setting on DSLR
On Nikon DSLR, you have to set to “receive IR” from menu.
Remote setting
menu
↓
Shooting menu
↓
Release mode
↓
Quick-response remote (ML-L3)
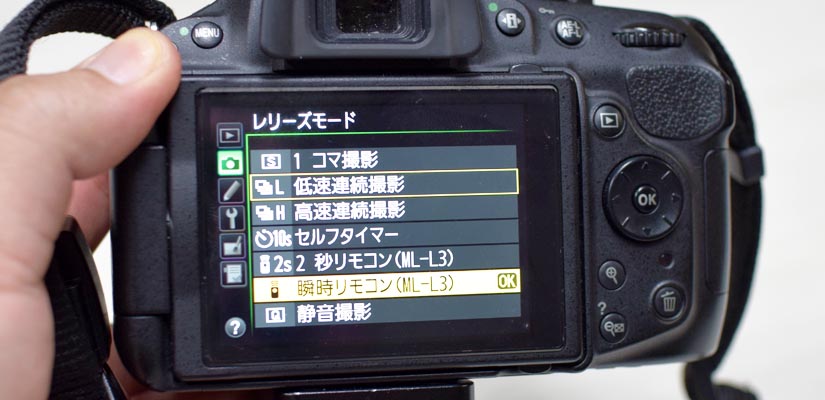
By the way, this setting seems to return to default when you turn off the power. Be careful.
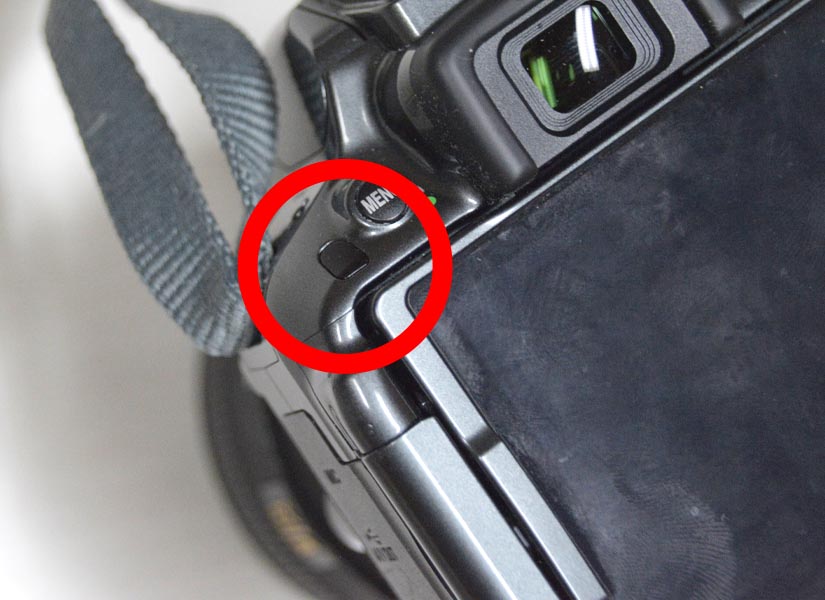
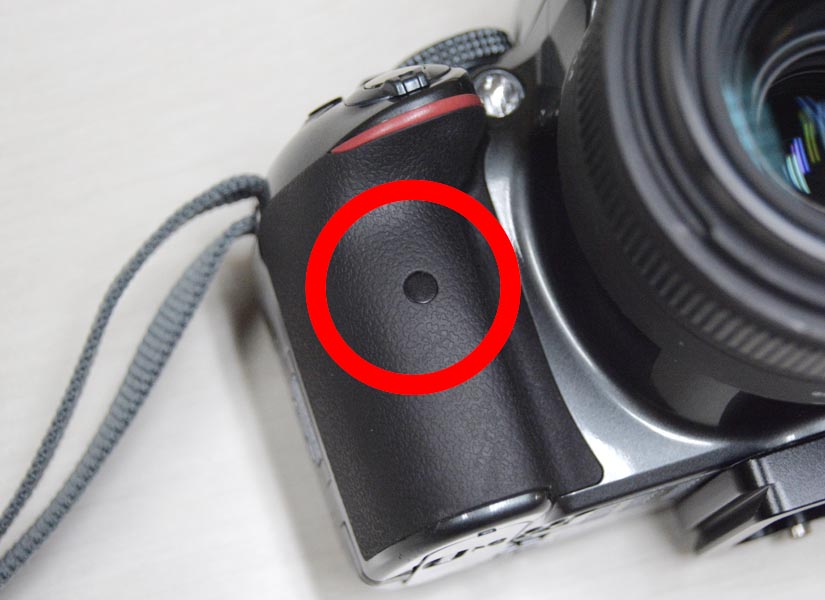
Receiver device
There are two IR receiving device on Nikon DSLR. You should aim IR LED to here.
 |
 |
Explanation for IR
On / Off
IR transmission function is very similar to normal digital communication.
For example, in general, digital signals are separated by a fixed time, and bits are detected by the difference in on / off of voltage that occurred during that time.
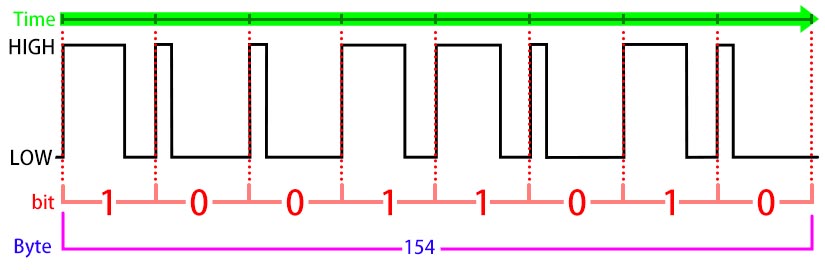
You can say this is replaced by the blinking IR LED as it is.
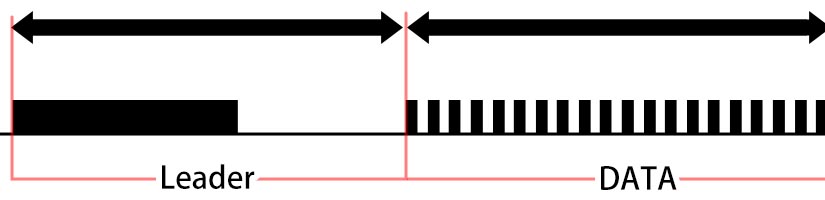
However, there are no common format in IR transmission. Only one thing I can say is that every format has a “leader” signal and “data” signal.
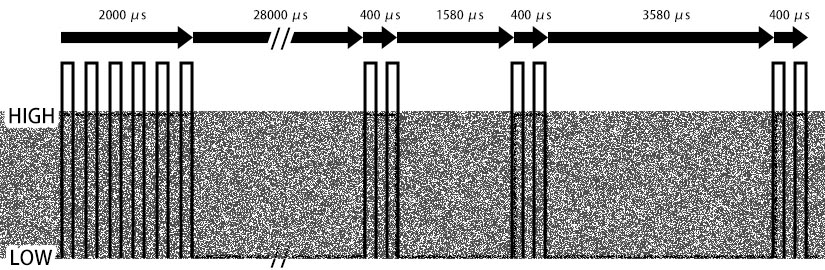
So, Nikon’s infrared remote has the time scale rule as follows.
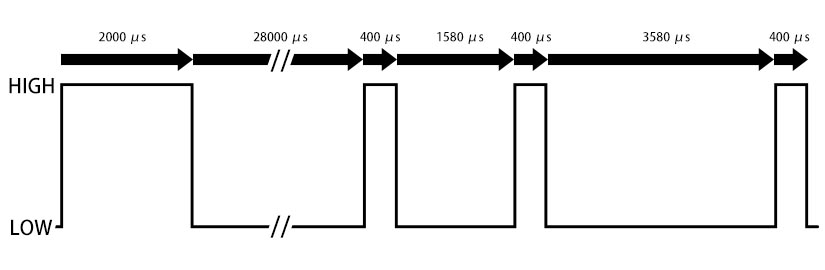
It seems that this blinking needs to be repeated twice with an interval of 63.2 milliseconds.
At first, I thought that I can send this command just by “digitalWrite” and “delay”. This is the experiment sketch.
#define IRLED 3
#define SW    8

void setup() {
  pinMode(SW, INPUT_PULLUP);
  pinMode(IRLED, OUTPUT);
}

void loop() {
  int gauge;
  //switch read without chattering
  while (!digitalRead(SW)) gauge++;

  //send shutter command
  if (gauge > 700)
  {
    for (byte i = 0 ; i < 2 ; i++)
    {
      digitalWrite(IRLED, HIGH);
      delayMicroseconds(2000);
      digitalWrite(IRLED, LOW);
      delayMicroseconds(28000);
      digitalWrite(IRLED, HIGH);
      delayMicroseconds(400);
      digitalWrite(IRLED, LOW);
      delayMicroseconds(1580);
      digitalWrite(IRLED, HIGH);
      delayMicroseconds(400);
      digitalWrite(IRLED, LOW);
      delayMicroseconds(3580);
      digitalWrite(IRLED, HIGH);
      delayMicroseconds(400);
      digitalWrite(IRLED, LOW);
      delayMicroseconds(63200);
    }
  }
}
But, it never works. Because there is a rule to use general IR as transmitter.
Carrier and subcarrirer
Since infrared light exists in the nature, the light emitted by the infrared LED is buried within the noise. So, receiver cannot receive the command signal as it is.

Therefore, efficient way is give the IR LED rest at regular intervals instead of letting the infrared LEDs shine all the time. Saving the energy (electricity) accordingly and release it at once.
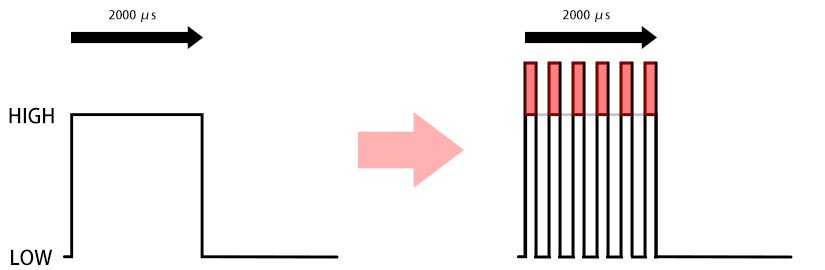
By doing this, it is possible to release infrared light which can be clearly distinguished from noise.
And if it being checked on the same cycle by the receiver, it will be able to restore and recognize it as an equivalent signal as a result.
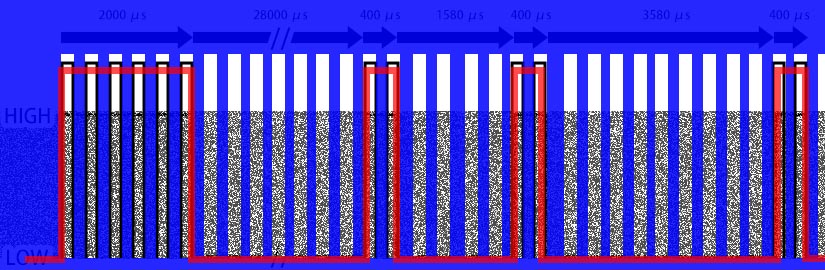
This is what I understood a method called “carrier” and “subcarrier” by infrared communication. “Carrier” is the transmission / reception blinking cycle, “Sub-carrier” is the data you want to actually send.
According to SB-Projects, Nikon IR remote release format seems to send with a carrier wave of 38kHz,
1000000(1 sec*1000 millisec*1000 microsec) ÷ 38000 Hz = 26.31…
In my thought, if the subcarriers can be transmitted with repeating on / off every 26 microseconds, it will function as a command signal.
So, by putting the changeover scale in the array, I can repeat the blinking of the carrier at constant intervals in the loop.
unsigned short ShutterDATA[7][7] = {
  {2000 , 1},
  {28000, 0},
  {400  , 1},
  {1580 , 0},
  {400  , 1},
  {3580 , 0},
  {400  , 1}
};
However, on Arduino, some functions waste a few microseconds in one command. It is necessary to insert delay in anticipation of this for carriers.
Well conveniently, “ERESTAGE” site tells us how long time is proper.
// Repeating function for each blinking time of infrared
for (byte i = 0 ; i < 7 ; i++)
{
  // Get the start time of one piece of durations
  unsigned long time_bit = micros();

  // Repeat until the specified duration from the start time
  while ((micros() - time_bit) <= ShutterDATA[i][0])
  {
    // The LED is lighted on / off according to the array setting order.
    digitalWrite(IRLED, ShutterDATA[i][1]);
    // Waiting time for cycle 1 of carrier
    delayMicroseconds(5);
    // Turn off for carrier period
    digitalWrite(IRLED, 0);
    // Waiting time for cycle 2 of carrier
    delayMicroseconds(10);
  }
}
In terms of the above reasons, the longer the longer break time could be make electric charge, I think. So I changed the balance of delay time from the reference site, although I will never know that changes make efficient.
That’s the all of the first sample sketch meanings.
After all
Despite I wrote so far, you can get this type of remote control in quite reasonable price at Amazon. On the contrary, genuine article of nikon remote is not so expensive. You should get it if you don’t want to gamble it with cheap unstable ones.
However, if it is to know the mechanism of infrared communication, this is a great teaching material…. I think.
Well, at this conclusion, it makes me regrets. So I made a sketch this Remote with timer function. One thing, this need to be keep on aiming receiver. Cos it is just a delay function of release transmission.
Sketch “Arduino de Nikon IR Shutter”
The circuit diagram is the same as above. However, a 13-pin LED is required for operation.
How to use
When you press the switch, it immediately turns off the shutter.
If you hold down for a long time, the 13-pin LED flashes slowly.After you release it, the 13-pin LED will light for 3 seconds, so press the switch for the number of seconds you want specify during. Then the 13-pin LED blinks for the number of seconds, then shutter is released.
*This sketch uses “B2CS library“.
#include <B2CS.h>

#define LED    13
#define IRLED  3
#define SW     8
#define DATA_SIZE 8

boolean led_status;
static unsigned long time_led;

B2CS nik;

void setup() {
  pinMode(LED, OUTPUT);
  pinMode(IRLED, OUTPUT);
  nik.setSW(SW, INPUT_PULLUP, 0);
  nik.GO();
}

void loop() {
  byte sw_status = nik.read(SW);

  // shutter timer command
  if (sw_status == SW_RELEASED_LONG)
  {
    SHUTTER_TIMER_GO();
    delay(50);

    // simply shutter command
  } else if (sw_status == SW_RELEASED) {
    LED_FLICKER(6, 50);
    SHUTTER_GO();
    delay(50);

  } else if (sw_status == SW_PUSHED_LONG) {
    if ((millis() - time_led) > 500)
    {
      led_status = !led_status;
      time_led   = millis();
    }

  } else if (sw_status == SW_PUSHED) {
    led_status = 1;
    digitalWrite(LED, HIGH);

  } else {
    led_status = 0;
    led_status = false;
  }
  digitalWrite(LED, led_status);
}


void SHUTTER_TIMER_GO() {
  byte push_to_time;
  led_status = 1;
  digitalWrite(LED, led_status);


  // get interval time from pushing

  unsigned long time_get_val  = millis();
  unsigned long time_led_push = millis();

  while ((millis() - time_get_val) < 3000)
  {
    byte sw_status = nik.read(SW);
    if (sw_status >= SW_RELEASED)
    {
      time_led_push = millis() + 50;
      push_to_time++;
    }

    led_status = (time_led_push > millis()) ? 0 : 1;
    digitalWrite(LED, led_status);
  }


  // waiting until shutter time

  unsigned long timer_wait = millis();
  bool cancel = false;
  led_status = 0;

  nik.read(SW);  // reset switch status

  while ((millis() - timer_wait) < (push_to_time * 1000))
  {
    // cancel function
    byte cancel_sw = nik.read(SW);
    if (cancel_sw == SW_RELEASED_LONG)
    {
      cancel = true;
      break;
    }

    if (((millis() - timer_wait) % 1000) < 10) LED_FLICKER(4, 100);
    led_status = 0;
    digitalWrite(LED, led_status);
  }

  // shutter task
  if (cancel == 0)
  {
    LED_FLICKER(10, 50);
    SHUTTER_GO();
  }
}

void LED_FLICKER(byte times, byte dur) {
  for (byte i = 0 ; i < times ; i++)
  {
    digitalWrite(LED, i % 2);
    delay(dur);
  }
}

unsigned short ShutterDATA[DATA_SIZE] = {
  2000, 28000, 400, 1580, 400, 3580, 400, 63200
};

void SHUTTER_GO() {
  led_status = 1;
  digitalWrite(IRLED, led_status);   // IR LED off forcely
  delay(50);

  // send total IR Signal 2 times
  for (byte repeat = 0 ; repeat < 2 ; repeat++)
  {
    // for each IR Pulse duration
    for (byte i = 0 ; i < DATA_SIZE ; i++)
    {
      // get start time
      unsigned long time_bit = micros();

      // repeat during its duration
      while ((micros() - time_bit) <= ShutterDATA[i])
      {
        digitalWrite(IRLED, !(i % 2));
        delayMicroseconds(4);
        digitalWrite(IRLED, 0);
        delayMicroseconds(11);
      }
    }
  }
  led_status = 0;
  digitalWrite(IRLED, led_status); // IR LED off forcely
}
I wish if it will makes sense to make a self-made …
Reference site